
Easy Thrift Store Jewelry Updates
Weekend afternoons are perfect for thrift-store shopping! As you’re perusing the gently used clothes, books, and household goods, make sure you seek out the jewelry section. On a recent trip to my local thrift store, I spent $5 on a dose of creative inspiration. I bought plain bangle bracelets, a wooden bead necklace, and a beaded headband. All of them inspired me to do some jewelry-making hacks and stash busting for these easy thrift store updates.
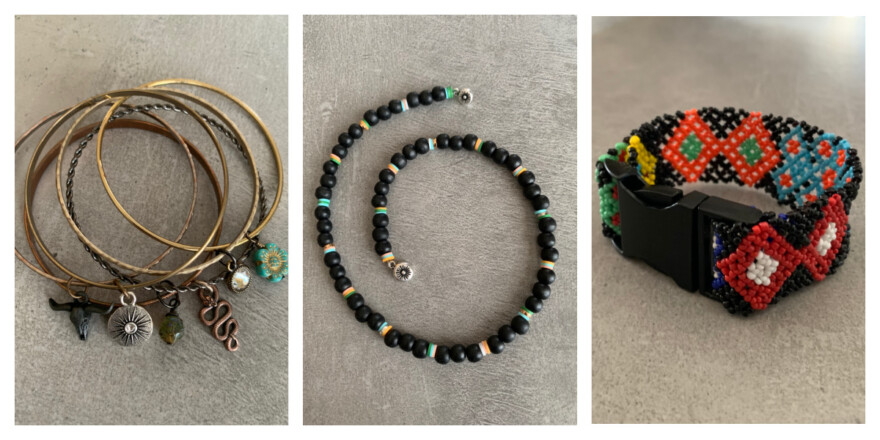
Above: Katie’s recent thrift store jewelry updates.
Three Ideas to Update Thrift Store Jewelry
1. Put a Charm on It
I lucked out with this mixed-metal collection of metal bangles! Bangle bracelets are a bargain at $1.50 per bundle at my local thrift store. The copper-pewter-brass tones go with any outfit and make it easy to customize them. Bangles are made in different sizes so make sure yours fit your hand before you buy them. I used head pins, jump rings, charms, and beads left from other projects to dress up the bangles.


Basic findings make it quick and easy to dress up your bangles. If your bracelet stack includes different sizes of bangles, then you’ll need a variety of jump rings to fit them. The same advice goes for head pins. Make large wrapped loops that fit comfortably around your bangles, so the dangles slide freely around the bracelet. For these embellished bangles, I used charms and findings from TierraCast with Czech glass beads from Raven’s Journey.
Challenge yourself to work with a theme (I chose Southwest!), favorite color palette, or material such as pearls so your bangle set has a cohesive look.
2. Simple Stringing
You know how home improvement show designers are always talking about houses with good bones? The same goes for beaded jewelry. If you can look beyond the design to see the beauty of the beads themselves, then you will find many treasures to incorporate into your own jewelry projects. Update the style by adding other beads from your collection.
These wooden beads just spoke to me. Chances are, you will find beads you adore that are part of a necklace or bracelet you do not adore.


For this casually chic necklace, I strung colorful vulcanite heishi beads between wooden beads in a repeating pattern. The vulcanite beads are flexible, so they provide a cushioned buffer for the large-hole wooden beads. I used a large diameter of flexible beading wire (.21″) and a TierraCast magnetic clap. Using spacer beads with smaller holes helps create a smoother beaded strand.
3. From Headband to Cuff
This beaded headband was a fun discovery. There are many ways to turn it into a cuff, from creating a beaded button-and-loop closure to attaching the appropriate size of tube slide clasp. I took an easy route and used a metal backpack clasp from the notions-aisle of my local craft store. Alternatively, you could use a clasp from an old backpack.


You’ll need a hard beading needle and your choice of beading thread to stitch the folded end of the headband to itself. The trickiest part of stitching the beadwork together is deciding whether to follow the beadwork pattern or stitching through it and hiding the thread.
Are you inspired by beaded jewelry you find at your local thrift store? We’d love your tips and tricks for transforming bargain finds. Leave a comment below.
Related: Fun with Upcycling: Dollar Store Earrings


One of my fave items to upcycle are vintage enamel pins. I like the large floral ones! I like to take them apart and use the individual components in different ways. Layers of a flower can become earrings and a matching pendant.