How to Do Circular, Flat Peyote Stitch the Right Way

 Circular, flat peyote stitch is a great beadweaving technique for someone who wants to not only expand their beadweaving skills, but also wants to learn more about shaped and geometric beadwork. When you learn circular, flat peyote stitch, you’ll also develop your skills at creating shaped beadwork! Here we go!
Materials Needed:
- Two highly contrasting colors of size 8o seed beads
- Beading thread of your choice, preferably in a heavier weight (10 lb. Fireline or Nymo D)
Beading Tools:
- Size 12 beading needle
- Scissors or thread cutter
Learn how to do the circular, flat peyote stitch the RIGHT way:
-
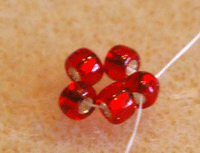
 On a comfortable length of thread (no longer than five feet), pick up five seed beads. Do not tie these beads into a ring! Leaving the ring loose will help you with proper spacing of the beads in the critical first few rounds of circular, flat peyote stitch.
Pass through the first bead strung and pull into a circle.
-
 Pick up a bead of contrasting color and stitch through the next bead in the ring. Keep your tension loose so that the bead fits into place without too much tugging or pulling.
 -
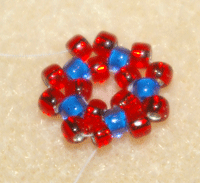
 Continue adding beads in this manner until you have added a total of five seed beads. Step up through the first bead added.
 -
 This is what your first two rounds will look like. Don’t worry too much if you can see a bit of thread between each of the beads in the initial circle of seed beads. It’s more important to make sure that your spacing is even and loose so that the beads fit together properly, and your piece of circular, flat peyote stitch won’t warp or become misshapen as you stitch.
 -
 You’ll notice that there is a larger space between each of the beads you stitched in the previous round. For this round, pick up two seed beads and pass through the next up bead in the round, keeping your tension loose and comfortable.
 -
 At the end of the round, step up through the first pair of beads added, treating them as a single unit.
 -
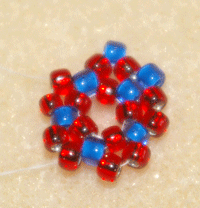
 For the next round, you’ll be adding one seed bead in each space between bead pairs as well as one seed bead between each bead in a pair. You should have a total of ten beads in this round.
Again, keeping your tension loose will allow the beads to fall into place easily without much chance of misshapen beadwork or broken beads.
-
 At the end of this round, you’ll add one last bead between a pair of beads from the previous round, and then make your step up through the first seed bead added in this round.
 -
 Add one bead in each space for the next round. You should be adding a total of ten beads, keeping your tension loose, and making a step up at the end of the round.
 -
 Now you’ll notice that there are some spaces between up beads that are wider and some that are narrow. For this round, we’ll start by adding a pair of beads, then a single bead, and repeating around for a total of fifteen beads added.
At the end of the round, step up through the first pair of seed beads added, treating them as a single unit.
-
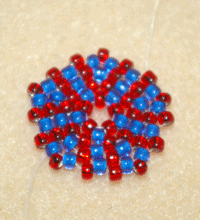
 Add one seed bead in each space between up beads, as well as between each pair of beads added in the previous row. Again, keep your tension loose as you stitch.
You can continue to add as many rounds as you like, adding two beads in the spaces between up beads in each round as necessary. Trust your instincts, and see where your creativity will lead you next! Try out your new-found beading skills with a FREE circular peyote stitch beading pattern, Peyote Star Earrings by Barbara Richard, found in the free eBook on seed bead earrings.
Bead Happy,

Jennifer


Join the Conversation!