
Cable Knitting Without a Cable Needle
This article, by Joni Coniglio, was originally published in Knitscene Accessories 2014.
A cable needle is one of those handy tools that can be found in almost every knitter’s toolbox—or not. Some knitters prefer to work cables without using the cable needle because they feel it slows down their progress, especially if they are knitting a garment with frequent cable crossings. And if you’re working cables that require two cable needles, it can get quite tedious. Even if you don’t mind using a cable needle, you may occasionally find yourself in a situation where your cable needle has gone missing, and you don’t want to stop to look for it. Knowing how to work cables without using a cable needle is a useful skill.
There are several different methods for cable knitting sans needle. Some methods involve removing all the stitches that will be involved in the cable from the needle at one time, then placing them back onto the needle in the new order before knitting them. But this method has a couple of disadvantages. It’s easier to lose stitches, even if you “pinch” them. And it also increases the likelihood of twisting or splitting the stitches when replacing them on the needles. Other methods, such as those described below, involve removing only a couple of stitches from the needle and immediately replacing them. This makes it much easier to avoid losing stitches.
If you’ve never cabled without a cable needle, I suggest practicing on a swatch first to see which method you prefer. Practice removing stitches from the knitting needle and replacing them so that they are oriented correctly on the needle (with the right leg of the stitch in front of the needle). This is important or the stitches will be twisted. You can even try dropping stitches and retrieving them so that if it happens on your project, you’ll know what to do.
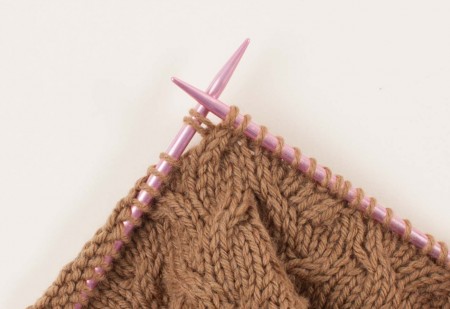
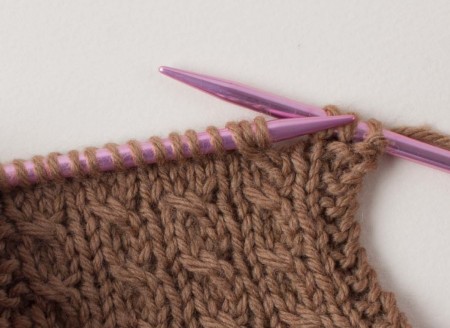
2/2 RC
Method 1
With the right needle in front of the left needle, skip stitches 1 and 2 and insert the right needle into stitches 3 and 4 (figure 1). Slide all 4 stitches off the left needle, with stitches 1 and 2 unsecured behind the right needle. With the left needle behind the right needle, insert the left needle into stitches 1 and 2 (figure 2). Return stitches 3 and 4 to the left needle (figure 3). The stitches are now in the correct order for the cable. Knit all 4 stitches.


Method 2
With the yarn in back, slip all 4 stitches from the left needle to the right needle. With the left needle behind the right needle, insert the left needle into the back loops of stitches 1 and 2 (figure 1). Slide all 4 stitches from the right needle, with stitches 3 and 4 unsecured in front of the left needle. Insert the right needle into stitches 3 and 4 (figure 2). Return stitches 3 and 4 to the left needle. The stitches are now in the correct order for the cable. Knit all 4 stitches.


Method 3
With the yarn in front, slip stitches 1 and 2 to the right needle. Bring the yarn to the back between the needles (figure 1) and knit stitches 3 and 4 (figure 2). With the left needle behind the right needle, insert left needle into back loops of stitches 1 and 2 (figure 3). Slide all 4 stitches from the right needle, with stitches 3 and 4 unsecured in front of the left needle. With the right needle in front of the left needle, insert the right needle into stitches 3 and 4 (figure 4). Knit stitches 1 and 2 on the left needle.


2/2 LC
Method 1
With the yarn in back, and the right needle behind the left needle, skip stitches 1 and 2 and insert the right needle into the back loops of stitches 3 and 4 (figure 1). Slide all 4 stitches off the left needle, with stitches 1 and 2 unsecured in front of the right needle. Insert the left needle into stitches 1 and 2 (figure 2). Return stitches 3 and 4 to the left needle (figure 3). The stitches are now in the correct order for the cable. Knit all 4 stitches.


Method 2
With the yarn in back, slip all 4 stitches from the left needle to the right needle. Then, with the left needle in front of the right needle, insert the left needle into the front loops of stitches 1 and 2 (figure 1). Slide all 4 stitches from the right needle, with stitches 3 and 4 unsecured behind the left needle. With the right needle behind the left needle, insert the right needle into stitches 3 and 4 (figure 2). Return stitches 3 and 4 to the left needle. The stitches are now in the correct order for the cable. Knit all 4 stitches.


Method 3
With the yarn in back, slip stitches 1 and 2 to the right needle (figure 1), then knit stitches 3 and 4. Then, with the left needle in front of the work, insert left needle into front loops of stitches 1 and 2 (figure 2). Slide all 4 stitches from the right needle, with stitches 3 and 4 unsecured behind the left needle. With the right needle behind the left needle, insert right needle into stitches 3 and 4 (figure 3). Knit stitches 1 and 2 on the left needle.


1/1/1 LC
With right needle behind the left needle, skip stitch 1 and insert right needle into back loops of stitches 2 and 3 (figure 1). Slide all 3 stitches off left needle, with stitch 1 unsecured in front of right needle. With left needle in front of right needle, insert left needle into stitch 1 (figure 2). Bring it in front of stitches 2 and 3 and return stitches 2 and 3 to the left needle (figure 3). With right needle in front of left needle, insert right needle into new stitch 2 (figure 4). Slide new stitches 1 and 2 off left needle, leaving stitch 1 unsecured in back of right needle. With left needle behind right needle, insert left needle into stitch 1 (figure 5). Return stitch 2 to left needle and knit all 3 stitches.


1/1/1 RC
With right needle in front of left needle, skip stitches 1 and 2 and insert right needle into stitch 3 (figure 1). Slide all 3 stitches off left needle, with stitches 1 and 2 unsecured in back of right needle. With left needle in back of right needle, insert left needle into stitches 1 and 2 (figure 2). Bring stitch 3 in front of stitches 1 and 2 and with right needle in back of left needle, insert right needle into back loop of stitch 2 (figure 3), slide both stitches from left needle, leaving stitch 1 unsecured in front of right needle. With left needle in front of right needle, insert left needle into stitch 1 (figure 4). Return stitches 2 and 3 to left needle and knit all 3 stitches.


Join the Conversation!